Amazing rental property photos are essential elements to effective online marketing. A big “For Rent” sign stuck in the front yard can work, but renters are more likely to find a property through a listing website today. Additionally, renters are more likely to contact a property manager or landlord if the property they find online has appealing images.
Before you start advertising your rental property online, remember this: it’s not necessarily about taking more photos, but rather better photos. One excellent photo that gives an understanding of how the kitchen flows into the living room is far more useful than 20 photos showing different angles of the balcony.
There are likely dozens of professional real estate photographers in your area, but they can be expensive, especially for the DIY landlord. There’s a lot that you can do yourself using your smartphone’s camera, and if you wanted to go the extra mile and invest in even a mid-range DSLR, the increased quality would show.
We’ve compiled these five simple photography tips designed to help you get top notch photos for your rental listing.
1. Go Wide Angle
Have you ever looked at real estate photos, whether for a rental listing or a house for sale, and been confused how the room connects to the rest of the space? Sometimes you’re just looking at a single corner of a room, and often you can’t decide what floor the room is on.
The first step to great real estate photos is to make sure your photos provide context, both for the space and for each other. Photo 1 should clearly connect to photo 2, and so on.
The best way to provide context in your photography is to use a wide-angle perspective and fit as much of the room into your frame as possible. Going wide does flattering things to your space, too, and you’ll be surprised how expansive your rental property can look when it’s photographed well.
If you’re looking to buy a wide-angle lens, we recommend something around 15mm on a full-frame camera sensor. That will give you a wide point of view without curving your normally-straight walls. If the above point sounded like Greek to you, don’t worry. Modern smartphones have wide-angle lenses built in, and they normally provide a great starting point for taking simple real estate photos.
When we say “wide-angle,” make sure you’re not going so wide that your photos give a fish-eye effect. Fish-eye occurs when the lens is so wide that it actually distorts the edges and can start to artificially bend walls. The key here is to show off your space without distorting anything.
2. Turn On The Lights
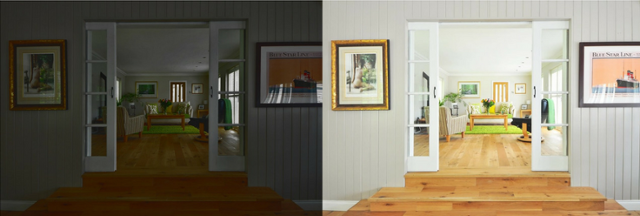
Without getting too technical, the literal act of taking a photograph is capturing light that hits a camera sensor. If you have too little light making its way to that sensor, your photo ends up dark, grainy, and unappealing. No one wants to live in a dark rental unit, and no one wants to squint to make out the details in your poorly-lit photo.
Turn on your lights! This may sound silly, but you’d be amazed and appalled how often property owners take an underdeveloped photo and call it a day.
How to Light Your Real Estate Photos
- Turn on every light in the room. This includes lamps, overhead lights, and vanity sink lights.
- If the room has windows, open those up, slant the blinds if you have them, and bring some sunshine inside.
- Photograph your rental unit on a bright, sunny day that can really show off the way light bounces around your inviting home.
People get pretty excited about the way a property can look when photographed at twilight or golden hour (that time just before sunset where things have a dreamy glow to them), but beware: twilight photos are difficult to capture well due to the lower light.
When talking about more light, you may be wondering about camera flashes. Yes, a flash can help brighten up a space, but it can also create artificial spotlights and bad glares. The bright white color of a flash can sometimes clash with the warm light of your rental unit’s lamps, so use a flash sparingly. In a perfect world, you’d get more than enough light from your light fixtures and windows.
3. Stand Where You Can See More
Oftentimes when we’re taking pictures, we don’t realize where we’re standing, or that what comes out in photos isn’t the same as what we can see with our own two eyes. When taking property images, take a few photos from different angles in each room to give several perspectives. Think about what a prospective renter would want to see and position yourself to show it off.
When you set up your shot, place your back against one of the corners of the room. This ensures that you’re getting as wide as possible. Try to arrange three of the room’s walls in the shot, even if the third one is just barely a sliver. By showing three walls, the viewer gets a clear understanding of the size of the room.
In the case of small rooms or tiny bathrooms, just try to show as much as you can. Many bathrooms are too small to get three walls in the shot, but you can at least show that it has a sink, toilet, and shower.
4. Hold the Camera Straight
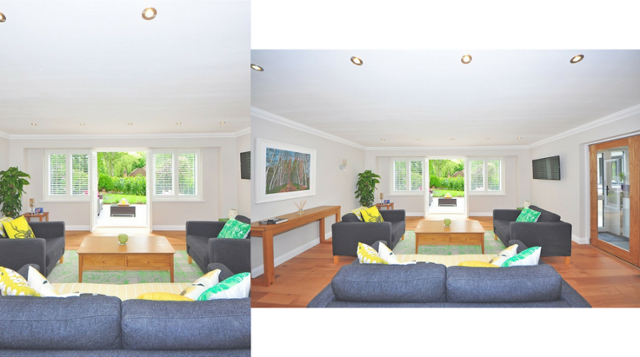
In filmmaking, there’s a term called a “dutch angle.” You’ll likely see it in a suspenseful scene, where the camera goes askew, pitching sideways to create a sense of unease. See the above photo on the left for how this can look.
As effective as a dutch angle can be in a horror movie, that is not the effect you want with your real estate photos. In fact, you shouldn’t be picking up any tips from horror movies for your rental business.
For great listing photos, you want your camera to be as straight as possible. Pay attention to both your vertical and horizontal lines, like walls, door frames, and light switch covers. It’s a subtle thing, but if horizontal lines aren’t lined up then a prospective renter might get the feeling that the rental property isn’t as spic and span as they’d hoped.
If you want to go the extra mile and really ensure that your photos are crisp and perfectly aligned, a tripod can be an excellent tool to add to your arsenal.
5. Declutter Your Space
It should go without saying that a cluttered space will not photograph well, but you’d be surprised. Just like you would stage a house when you list it for sale, you should stage your rental space for photos.
When cleaning up and de-cluttering, we don’t just recommend cleaning the obvious messes up. Clutter can come in the form of many things: trash cans, backpacks on the floor, unfolded blankets, food on the counter, and even decorative knick-knacks can be an eyesore.
One of the best ways to remedy this is to take everything off of the counters, coffee table, or mantle so that there’s nothing on them except for the essentials like a coffee maker, a box of coasters or a framed picture. You can always put things back right after taking the photos!
Bonus tip:
Turn off ceiling fans before you take photos. A blurred spinning fan in the middle of a photo can really add a sense of chaos that’s best left out of your listing.


